Forms in Docly: Leveraging Data-Group and Data-Table Attributes
In the realm of web development, managing forms efficiently is a key aspect of user interaction. Docly offers a suite of tools to enhance this experience, including the use of data-group and data-table attributes in forms. This post explores these attributes and the integration of /jquery.submitform.js for seamless form submissions.
Understanding Data-Group and Data-Table Attributes:
Docly's form management is made simple with the data-group and data-table attributes. These HTML attributes, specific to forms, play a pivotal role in how form data is presented in emails sent upon submission. The data-group attribute is ideal for segmenting form fields into logical groups, each with its own header. On the other hand, data-table is perfect for more compact layouts, organizing form data in a tabular structure.
Attribute | Description |
|---|---|
data-group | Used to segment form fields into logical groups, with each group having its own header in the resulting email. Ideal for categorizing fields and improving the readability of form submissions. |
data-table | Organizes form data in a tabular structure. Suitable for compact layouts, it presents form data in rows and columns in the email. Best for forms where space efficiency is a priority. |
The Power of jquery.submitform.js:
The /jquery.submitform.js script, a versatile addition to any website, requires jQuery to operate. Once included in a webpage, it automatically binds to any form, handling the submission process to Docly's servers for email dispatch. This script ensures that the site owner receives form submissions via email with minimal setup required.
<form id="TestForm">
    <input name="Name" />
</form>
<script src="/jquery.submitform.js"></script>
This example will submit the form to the site owner by email! Note that you need an ID specified for your form.
Practicality of Form Attributes:
These attributes offer flexibility and ease in form design. Whether you're grouping multiple fields under a common header using data-group or arranging them in a more space-efficient manner with data-table, these attributes cater to diverse layout needs.
Data-group example:

Data-table example:
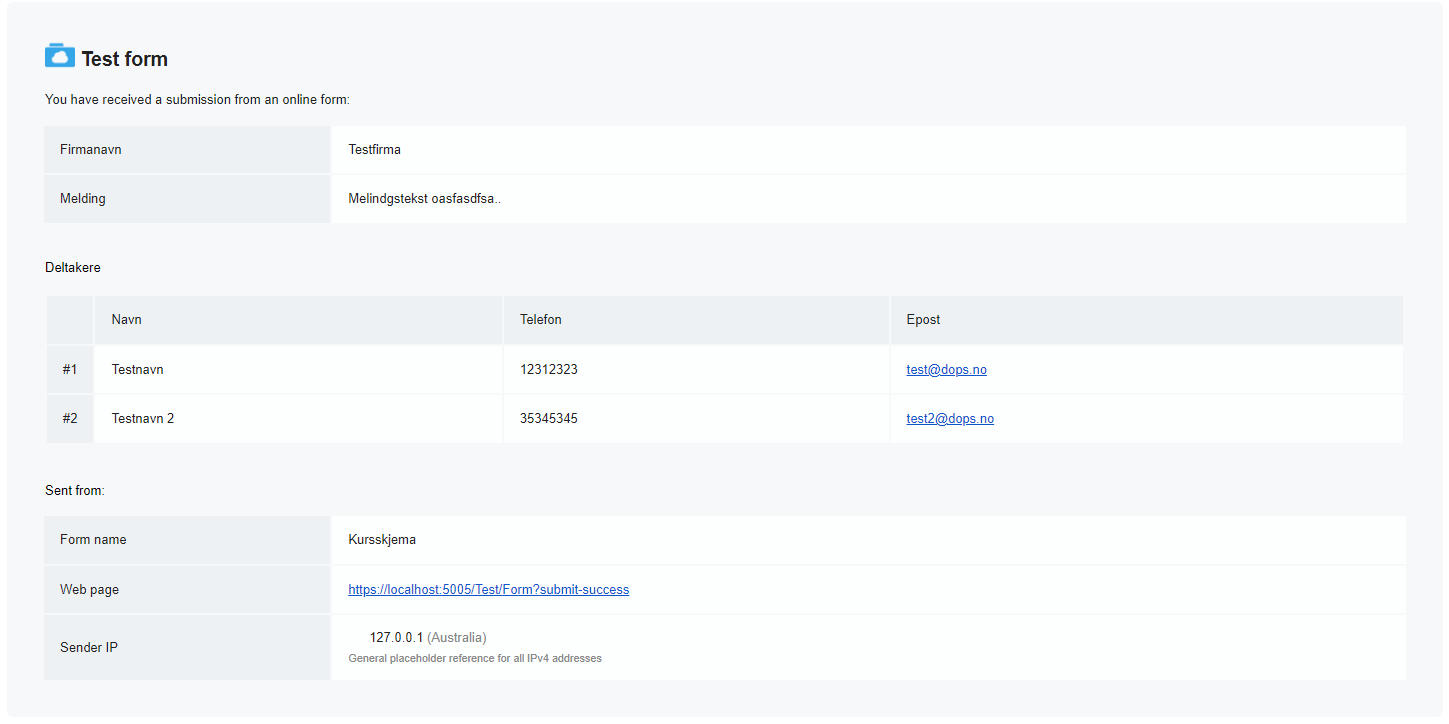
Real-World Application: Dynamic Attendee List for a Course
Consider creating an online form for a training course where each registrant can enroll multiple participants. Utilizing the data-table attribute, you can design a dynamic table within the form where each row represents a participant's details (like name, email, and contact number). This table format allows registrants to easily add or remove participants, ensuring a user-friendly experience.
In the resulting email to the course organizer, the data-table attribute would neatly organize these details in a tabular format, making it easier to review and process multiple entries.
<html>
<head>
    <title>Course Registration Form</title>
    <script src="https://code.jquery.com/jquery-3.7.1.min.js"></script>
    <script src="/jquery.submitform.js"></script>
</head>
<body>
    <form class="form-group" id="CourseForm">
        <div class="row">
            <div class="col-xs-12">
                <div class="form-group">
                    <input name="CompanyName" class="form-control" type="text" required placeholder="Company Name">
                </div>
                <div class="form-group">
                    <input name="Course" class="form-control" required value="Selected Course: [Course Name]" readonly>
                </div>
                <hr>
                <p><b>Participant Information</b></p>
                <div id="form-container" data-table="Participants">
                    <div class="form-group" style="display: flex;">
                        <input name="ParticipantName" class="form-control" type="text" required placeholder="Participant Name">
                        <input name="ParticipantEmail" class="form-control" required placeholder="Email">
                        <button type="button" class="remove-field-button">Remove</button>
                    </div>
                </div>
                <button type="button" id="add-field-button">Add More Participants</button>
                <button type="submit" class="submit-button">Submit</button>
            </div>
        </div>
    </form>
    <script>
        document.addEventListener("DOMContentLoaded", function () {
            const formContainer = document.getElementById("form-container");
            const addFieldButton = document.getElementById("add-field-button");

            addFieldButton.addEventListener("click", function () {
                const newFormGroup = document.createElement("div");
                newFormGroup.className = "form-group";
                newFormGroup.style.display = "flex";

                const newInputName = document.createElement("input");
                newInputName.name = "ParticipantName";
                newInputName.className = "form-control";
                newInputName.type = "text";
                newInputName.required = true;
                newInputName.placeholder = "Participant Name";

                const newInputEmail = document.createElement("input");
                newInputEmail.name = "ParticipantEmail";
                newInputEmail.className = "form-control";
                newInputEmail.required = true;
                newInputEmail.placeholder = "Email";

                const removeButton = document.createElement("button");
                removeButton.type = "button";
                removeButton.className = "remove-field-button";
                removeButton.textContent = "Remove";
                removeButton.addEventListener("click", function () {
                    formContainer.removeChild(newFormGroup);
                });

                newFormGroup.appendChild(newInputName);
                newFormGroup.appendChild(newInputEmail);
                newFormGroup.appendChild(removeButton);
                formContainer.appendChild(newFormGroup);
            });
        });
    </script>
</body>
</html>
This example illustrates the effective use of the data-table attribute in Docly to handle forms that require dynamic and multiple entries, simplifying both the data entry and review processes.
Let's conclude!
In conclusion, Docly's data-group and data-table attributes significantly enhance the readability and organization of form data. Whether grouping related fields for clarity or presenting information in compact tables, these attributes transform complex form submissions into structured, easy-to-read formats.
This streamlined approach to handling form data not only benefits form creators in terms of ease of design but also ensures that recipients can quickly interpret and act on the information received.