
Sending forms by e-mail Last updated: 21. Jul 2026
Use this documentation to setup page templates that submit forms by e-mail and add custom backend validation such as Google reCAPTCHA.
Setup any form you like in HTML, here is an example:
<form class="form-group" id="SignUpForm" data-smtp="#/MySmtpConfig"
    data-message="Thanks, your form has been submitted! We will send you further details to the e-mail address you specified.">
    <div class="row">
        <div class="col-md-4 col-sm-6">
            <div class="form-group">
                <label>E-mail</label>
                <input name="Email" class="form-control" type="email" required placeholder="(required)" />
            </div>

            <div class="form-group">
                <label>Name</label>
                <input name="Name" class="form-control" required placeholder="(required)" />
            </div>

            <div class="form-group">
                <label>Phone</label>
                <input name="Phone" class="form-control" required placeholder="(required)" />
            </div>
        </div>
    </div>
    <button type="submit" class="btn btn-default">Submit form</button>
</form>
<script src="/jquery.submitform.js"></script>
Use the extra attributes for:
Attribute | Description |
|---|---|
| Required. The server looks the form up by this id, and submission fails without it. |
| Message shown in place of the form after a successful submission. |
| File containing the message, instead of |
| Redirect to this URL after a successful submission, instead of showing a message. |
| Path to an SMTP configuration in the # folder. Uses the platform account if omitted. |
| Backend validation function in the API folder - reCAPTCHA, Turnstile or your own rules. |
| Set to "on" to show Docly's built-in anti-spam widget before sending. Needs no configuration. |
| Query string added to the page URL after submission. Defaults to |
| Turns on analytics tracking for this form. See the "Tracking form submissions" section below. |
| Excludes the form from the submit script so you can write your own submit logic. |
These attributes are only available on the <form> tag.
Two more attributes control how the submitted fields are laid out in the resulting e-mail. These go on the fields or on a container element inside the form, not on the <form> tag:
Attribute | Description |
|---|---|
| Groups fields into sections in the resulting e-mail. |
| Renders repeated fields as a table in the resulting e-mail. |
For worked examples of both, see Forms in Docly: Leveraging Data-Group and Data-Table Attributes.
Your form must have an unique id attribute set.
The data-smtp attribute is optional. If not specified, the form will be sent to the workspace owner via the Docly platform's no-reply account. For full control over sender address and delivery, specify your own SMTP configuration.
Docly ships two equivalent submit handlers, both always available at your root folder. Include one of them:
<!-- Sites that already load jQuery -->
<script src="/jquery.submitform.js"></script>

<!-- Sites without jQuery -->
<script src="/vanilla.submitform.js"></script>
Both pick up every form on the page except those marked data-nosend, post it to the form's action (or the current page if there is none), show the receipt message and set the URL marker. They behave identically, so pick whichever matches the rest of your site.
If your SMTP configuration does not work or stops to work (temporarily or permanently) an error message will be displayed to visitors attempting to submit forms. Your "data-message" will not be displayed.
The owner of the published folder must have read access to the configuration in order for it to work.
Setting up SMTP configurations
Enable developer options on your user.
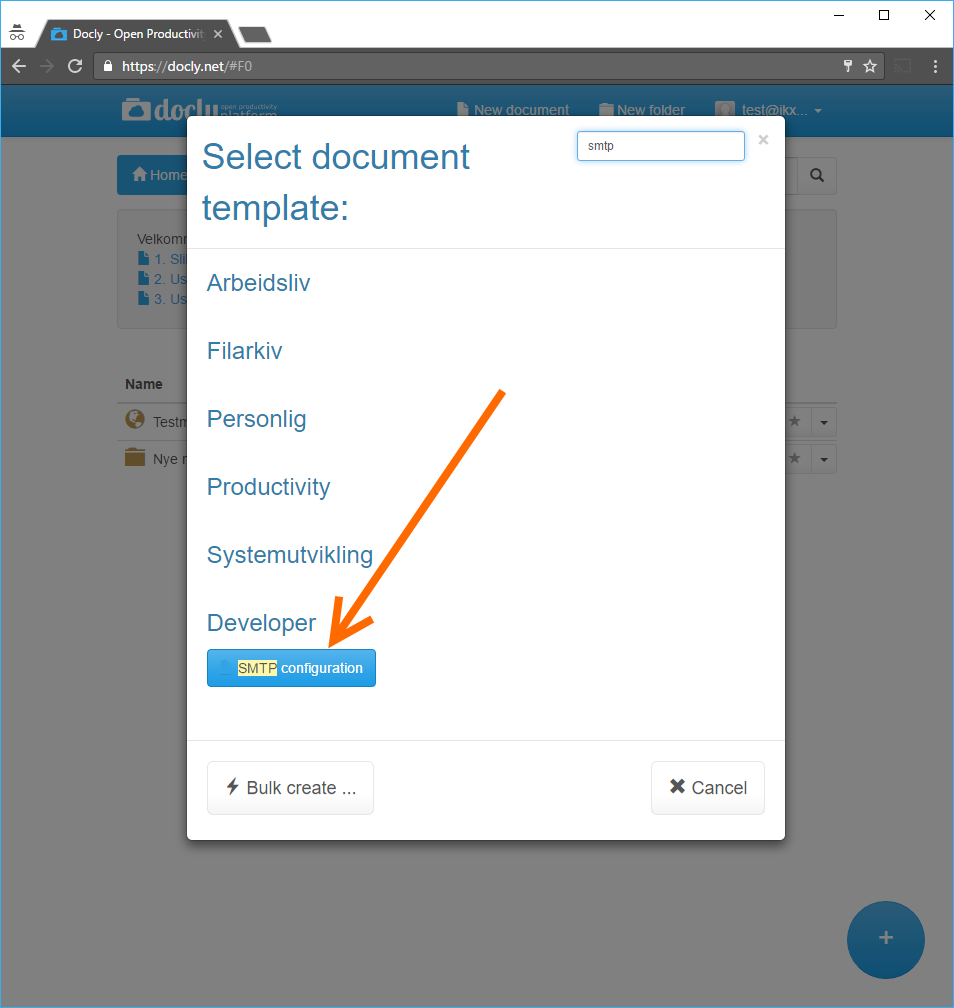
Click new and choose the "SMTP configuration" document template in the "Developer" section.
Data-messagefile example
<form class="form-group" id="SignUpForm" data-smtp="#/MySmtpConfig"
    data-message-file="/thanks.html">
    ....
</form>
Specify URL absolute for the published folder.
Remember to add the script in your page:
<script src="/jquery.submitform.js"></script>Tracking form submissions
After a submission the script updates the page URL with a marker - ?submit-success or ?submit-error. The marker is set with history.pushState(), and that is the catch: pushState fires no event. GA4 does not count a page view for it unless you write a listener yourself, and Google Ads never sees it at all. A form that only sets the marker is invisible to your campaigns.
Add data-track-event to send a real analytics event alongside the marker:
<form id="ContactForm" data-track-event>The event goes to gtag() if the page has it, otherwise to dataLayer for Google Tag Manager. It is never sent to both - on a page where Tag Manager loads gtag.js, that would count the same submission twice. Either way the form's id is sent as form_id, so you can tell a contact form apart from a signup form in your reports.
Markup | Successful submission | Failed submission |
|---|---|---|
no attribute | no event | no event |
|
|
|
|
|
|
Only mark the success event as a conversion. A failed submission is not a lead, and
?submit-errormust never be counted as one.
Tracking is off unless you ask for it. Sites differ in what analytics they already run, and some have their own form tracking or a Tag Manager container with broad triggers. Sending events to every site by default would change what those sites measure without anyone asking for it.
Pick the name to match your setup: generate_lead is what Google Ads normally expects for lead conversions, while docly_form_submit stays clear of GA4's own built-in form_submit event from enhanced measurement.
Forms that redirect with data-message-url are tracked too - the event is sent before the browser navigates away, so a thank-you page does not hide the submission from your reports. The gtag() call sets transport_type: "beacon" so the event is handed to navigator.sendBeacon(), which the browser completes even after the page has been torn down by the redirect.
The dataLayer fallback has no equivalent guarantee. A dataLayer.push() is only a queue entry, and whether it reaches Google depends on the tag your Tag Manager container fires - it can still be lost when data-message-url redirects immediately. If you redirect after submitting and need the count to be reliable, make sure gtag.js is loaded on the page so the beacon path is used.
>
Listening from your own script
The script also dispatches a DOM event on document, so you can hook up analytics that is not a Google product:
document.addEventListener('docly:form-submit', function (e) {
    // e.detail.formId   - the form's id attribute
    // e.detail.success  - true or false
    // e.detail.event    - the event name that was sent
});
A missing or broken analytics library cannot interrupt a submission - the tracking call is isolated, and a failure is logged to the console and otherwise ignored.
>
Verifying it works
Submit the form once on the live site.
Check GA4 under Realtime -> Events - the event should appear within seconds.
Mark it as a key event in GA4, then import it as a conversion in Google Ads.
Disable submit script handling
Use the data-nosend attribute to make the submit script ignore your form. Both jquery.submitform.js and vanilla.submitform.js honour it:
<form data-nosend ...>
....
</form>
This is needed if you use the <form> tag in your code and want to use your own submit handling / script.
Setting up backend validation in forms
Set up backend validation in forms using the data-validate attribute. Reference a backend validation function like this:
<form data-validate="FormValidator1" ...>
....
</form>
This will trigger the backend validator located in #/API/FormValidator1.js.
Code for FormValidator1.js:
export default () => {
    // The form values come in the "form" object as they are posted to the server

    let token = form["g-recaptcha-response"];
    if (!token) throw new Error("Validation failed: token not specified!");

    // Validates the token with Google reCAPTCHA.
    // Refer: https://developers.google.com/recaptcha/docs/verify
    // NOTE: This is a 3. party integration, it may be outdated at some point and require updates
    let googleUrl = "https://www.google.com/recaptcha/api/siteverify?response=" + token + "&secret=<ENTER-YOUR-SECRET-KEY-HERE>";
    let result = docly.httpPost(googleUrl, {});
    if (!result.success) throw new Error("Google validation failed!"); /* It didn't validate and code will exit here */


    return true; // Return true to confirm the validation
}
Read more about setting up reCAPTCHA here:
How to setup Google reCAPTCHA