Sending forms by e-mail Last updated: 31. Oct 2025
Use this documentation to setup page templates that submit forms by e-mail and add custom backend validation such as Google reCAPTCHA.
Setup any form you like in HTML, here is an example:
<form class="form-group" id="SignUpForm" data-smtp="#/MySmtpConfig"
    data-message="Thanks, your form has been submitted! We will send you further details to the e-mail address you specified.">
    <div class="row">
        <div class="col-md-4 col-sm-6">
            <div class="form-group">
                <label>E-mail</label>
                <input name="Email" class="form-control" type="email" required placeholder="(required)" />
            </div>

            <div class="form-group">
                <label>Name</label>
                <input name="Name" class="form-control" required placeholder="(required)" />
            </div>

            <div class="form-group">
                <label>Phone</label>
                <input name="Phone" class="form-control" required placeholder="(required)" />
            </div>
        </div>
    </div>
    <button type="submit" class="btn btn-default">Submit form</button>
</form>
<script src="/jquery.submitform.js"></script>
Use the extra attributes for:
data-message - Message to show after sending in form.
data-message-file - Reference til file containing message (use this optionally for data-message)
data-message-url - Redirect user after succesfully submitting form to your specified URL. (use this optionally for data-message and data-message-file)
data-smtp - Filepath of SMTP configuration to use for sending form. Always place this in the # folder.
data-validate - Refer to a backend JS function in your API folder that validates the form before sending (such as recaptcha validation)
These attributes are only available on the <form> tag.
Your form must have an unique id attribute set.
Be aware that it is not possible to send forms without specifying your own SMTP configuration. Docly does not provide any means for sending forms by e-mail.
Make sure the "jquery.submitform.js" is included, it is always available at your root folder.
If your SMTP configuration does not work or stops to work (temporarily or permanently) an error message will be displayed to visitors attempting to submit forms. Your "data-message" will not be displayed.
The owner of the published folder must have read access to the configuration in order for it to work.
Setting up SMTP configurations
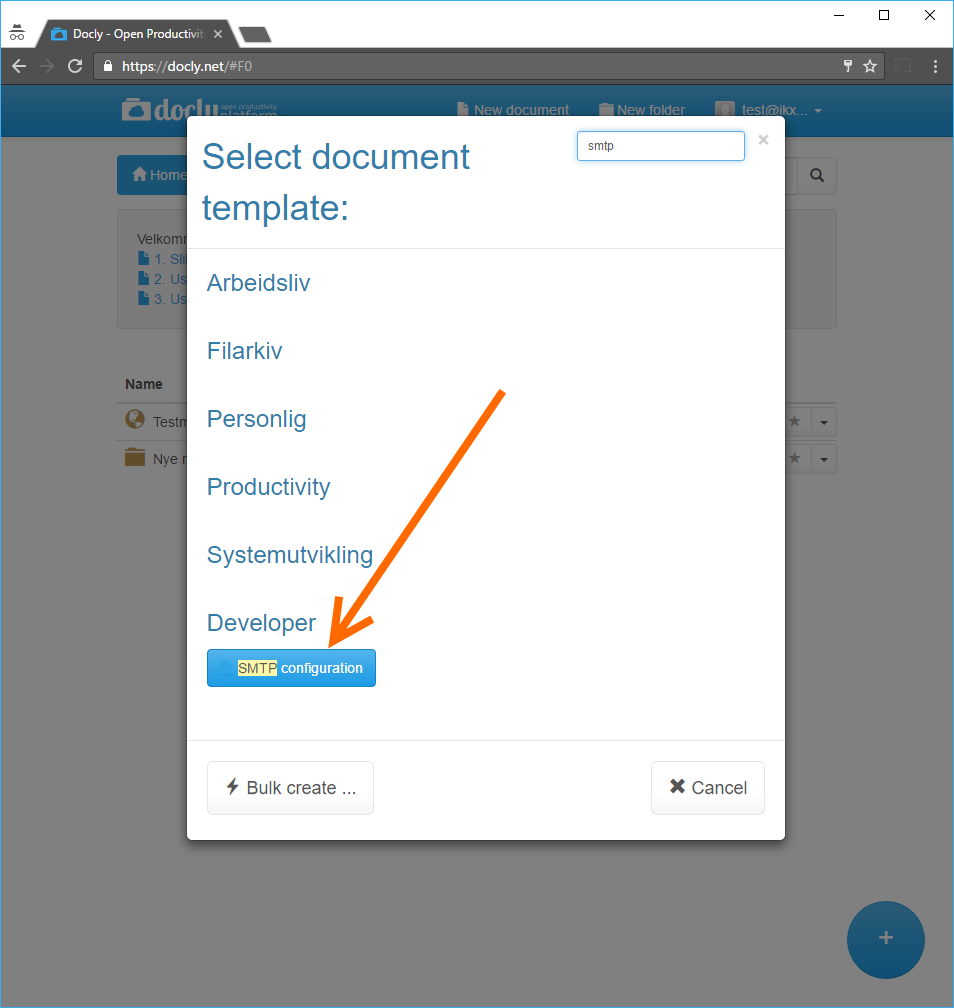
Enable developer options on your user.
Click new and choose the "SMTP configuration" document template in the "Developer" section.
Data-messagefile example
<form class="form-group" id="SignUpForm" data-smtp="#/MySmtpConfig"
    data-message-file="/thanks.html">
    ....
</form>
Specify URL absolute for the published folder.
Remember to add the script in your page:
<script src="/jquery.submitform.js"></script>Data-hash example
To make it possible to track your forms you can specify hash to add to URL after send:
<form class="form-group" id="SignUpForm" data-send-hash="form-sent-successfully">
    ....
</form>
The default hash will be "submit-success" if not set.
When successfully sent, the URL hash will change to #form-sent-successfully
To disable the hash set an empty attribute:
<form class="form-group" id="SignUpForm" data-send-hash="">
    ....
</form>
Disable jquery.submitform.js handling
Use the data-nosend attribute to make the submit form code to ignore your form:
<form data-nosend ...>
....
</form>
This is needed if you use the <form> tag in your code and want to use your own submit handling / script.
Setting up backend validation in forms
Set up backend validation in forms using the data-validate attribute. Reference a backend validation function like this:
<form data-validate="FormValidator1" ...>
....
</form>
This will trigger the backend validator located in #/API/FormValidator1.js.
Code for FormValidator1.js:
() => {
    // The form values come in the "form" object as they are posted to the server

    let token = form["g-recaptcha-response"];
    if (!token) throw new Error("Validation failed: token not specified!");

    // Validates the token with Google reCAPTCHA.
    // Refer: https://developers.google.com/recaptcha/docs/verify
    // NOTE: This is a 3. party integration, it may be outdated at some point and require updates
    let googleUrl = "https://www.google.com/recaptcha/api/siteverify?response=" + token + "&secret=<ENTER-YOUR-LEGACY-SITE-KEY-HERE>";
    let result = docly.httpPost(googleUrl, {});
    if (!result.success) throw new Error("Google validation failed!"); /* It didn't validate and code will exit here */


    return true; // Return true to confirm the validation
}
Read more about setting up reCAPTCHA here:
https://developers.docly.net/Blog/2021/How-to-setup-Google-reCAPTCHA